Photography is an art of creating images with the help of Camera. It works on the principals of science. When light from an object hits a photo sensitive surface through a narrow hole it creates a visually identical image, which is nothing but a set of 'pieces of photo information' of the subject.It is divided into millions of pixels .A Pixel can be understood as a tiny point in the subject that is clearly visible or distinguished by the Photo lens.
This article will help you understand the basics of photography. It will also teach you how to capture good shots with your Camera or Smartphone.
Go through step by step learning and at the end you will have a through understanding of these terms.

Photographic work can be divided into dozens of categories,many with lots of sub-categories. Here wee will explain some major photography in use. We believe that ''Photography is Making photographs rather than taking photographs''. Most of the users stick with automatic mode on their smart cameras but that doesn't always work. If you want to make more of your photos, you must take your control camera as by not doing so,one can never become an outlier.
This article will help you understand the basics of photography. It will also teach you how to capture good shots with your Camera or Smartphone.
Go through step by step learning and at the end you will have a through understanding of these terms.
- Photography,How does it work
- Understanding Camera
- Exposure Triangle
- Metering
- Macro photography
- How good is photography with smartphones.
- Antibanding, How does it affect our photographs.

Photographic work can be divided into dozens of categories,many with lots of sub-categories. Here wee will explain some major photography in use. We believe that ''Photography is Making photographs rather than taking photographs''. Most of the users stick with automatic mode on their smart cameras but that doesn't always work. If you want to make more of your photos, you must take your control camera as by not doing so,one can never become an outlier.
Understanding Camera
you might have a very expensive Camera but have you ever thought How does these things work.There are three essential components that together make a photo Good, average or poor. We call them ''The exposure Triangle'' The three pillars of photography.

- ISO
- Aperture
- Shutter speed
What is exposure?
Exposure is the measure of amount of light that hits the camera sensor and the resulting tonal range is captured in the image.If your photos are too bright they are overexposed while dark images are more likely to be underexposed .These three variables controls the exposure setting.
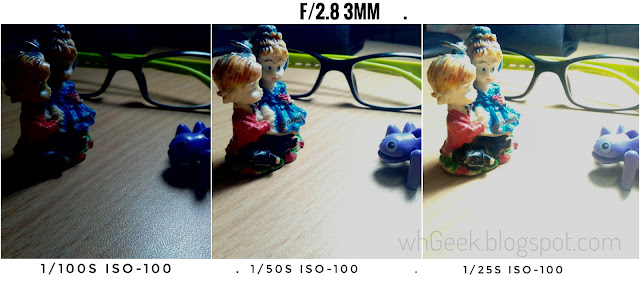
in this image we have takes 3 shots side by side .Most of the Camera have exposure setting varying between -3 to +3 while some high end cameras allow you upto -5 to +5. Here is how it appears.

Moving to the left results in darker image while moving right highlights the image. By default digital cameras adjust the three parameters so that Exposure is set to zero. This is the best suitable setting but sometimes when you are shooting in the dark you can simply +1 to meet the right exposure for your pictures.
This arrangement can also be made by increasing ISO but that gives more Noise in images.
What is ISO?
ISO is the measure of sensitivity of sensor for light. The higher the ISO number, brighter the Image.It helps you taking images in low light conditions. However increasing ISO no. also increases noise in Image which makes them grainy and less detailed. Most of the camera allow ISO ranging between ISO-100 to ISO-3200. A wise Photographer would choose Least possible ISO setting for available light to get more details in their images. But if you are shooting in night with less light hitting camera sensor, you should opt a higher ISO ,'' it is better to take overexposed Noisy images rather than underexposed dark images with no detail''.


here we have compiled a couple of images in ascending ISO order. At ISO-100 camera sensor is least sensitive resulting in completely dark image. at ISO 1600 image is bright enough but noise can be seen everywhere in the photo. Increasing ISO further to 3200 gives super bright result, at the moment the camera sensor is at its peak sensitivity for light.
Aperture
Aperture plays a key role in photography. It controls the depth of field which means, by changing the camera aperture you can change the focus area in an image .It is measured in f-stop number. Higher the aperture more shallow the depth of field. This sounds weird. Let us explain you by illustration.

We see that at f/16 the opening of the camera has shrinked to a tiny hole through which the passes to digital sensor,resulting in shallow depth of field while moving to the right in the graph covers more subjects in the lens focus area giving you a broad depth of field.
low aperture setting is mostly used in landscape photography.
It is practically similar to our eyes,ehen our eyes are open , we can see a wide angle view but if we close them to some angle we barely see things because of less light passing through lens.

In this image we can clearly see that that Higher f-stop number has resulted into shallow depth of field.Objects behind the toys are blurred or less detailed. By applying different aperture setting User can focus on the objects he wish to choose.
Shutter speed
Shutter speed is the length of time for which the camera sensor is exposed to light.It is usually measured in seconds. Faster shutter speed tends to freeze action while slower shutter speed makes images blur.
Blurred images are less detailed but for creative photography both have their own meanings.
Blurred images are less detailed but for creative photography both have their own meanings.
Faster shutter speed is mostly used to take motion shots as to freeze the moving objects we need to increase the shutter speed to 1/10s , 1/100s or sometimes as fast as 1/10000s or more of a second. Slower shutter speed make images completely blurred and uncomprehensible.
Till now we have learned the fundamentals of photography which is a common link between a novice and a professional .Now let us move to next chapter.
Sometimes user ask us how to do photography with Smartphones. As everyone can't afford DSLR cameras because of expensive price. Don't panic We have a surprise for you.
Nowdays dozens of companies are pioneering in smartphone market.They are producing high end devices Equipped with HD cameras to meet the demands of new generation. Also over the years,a significant hike has been observed in smartphone camera features that stand smartphones a good choice for personal photography.

Here we have taken a close look at a basic smartphone camera interface.Look at the image thoroughly. These couple of features can be spotted in any modern camera device. Let us explain you step by step.
Till now we have learned the fundamentals of photography which is a common link between a novice and a professional .Now let us move to next chapter.
Sometimes user ask us how to do photography with Smartphones. As everyone can't afford DSLR cameras because of expensive price. Don't panic We have a surprise for you.
Nowdays dozens of companies are pioneering in smartphone market.They are producing high end devices Equipped with HD cameras to meet the demands of new generation. Also over the years,a significant hike has been observed in smartphone camera features that stand smartphones a good choice for personal photography.
How good is photography with smartphone?
A decade earlier, photography term was limited to only Cameras but now the scenario has changed. We have entered in a new era say, 'Digital era'. Everything from our early morning schedule to late night job is associated with these tech gadgets.
.

Here we have taken a close look at a basic smartphone camera interface.Look at the image thoroughly. These couple of features can be spotted in any modern camera device. Let us explain you step by step.
Resolution:
When we think of camera ,Resolution is the first thing that comes in our mind. Some people believe that Higher resolution is always best choice.They buy expensive camera phones to thrill their friends but that isn't always a good scenario. Smartphone companies produce huge number of mobile phones in a row. Though not all of them are Flagship devices. Some of them have excellent Battery back up, some have marvelous camera. Better right! But,Did you know ? Amid Flagship phones some cheap devices are also launched with high price .They are costly but poor in performance. Beware and choose your purchase wisely otherwise you may grab a white elephant in exchange of your hard earned money.
However resolution is very important and affects image quality tremendously. Higher resolution yields more detail in images. Go with big one but think twice as resolution isn't the only parameter that makes your camera good. There are a few tips How to choose a good Camera phone, We will write a separate article on this topic.
Metering
Metering is measure of brightness of a subject. Camera uses a built in chip to understand a decide best setting for ISO, Aperture and shutter speed. There might be hundreds of combinations of these three parameters that will give you almost same result. No combination can be said to be perfect as these parameters vary for every second image taken. You need practice yours hands to achieve advance photography skills. This might take you weeks /months or more,Fortunately Metering does this for us by measuring the light density in our photos . Let us explain you.
There are basically three modes in Camera Metering setting.
- Frame average/Matrix
- Center Weighted
- Spot metering
matrix/frame average
In this mode a matrix is shown on the camera interface.The chip uses different areas of the subject to process information and chooses a right setting for your picture so that the brightness is average to the whole frame.
Center spotted
This setting is preferred when the subject lies in the mid of the frame. In this mode camera adjusts setting considering center as priority. If subject at the center is brighter with respect to rest of the frame then image will be underexposed,not in all cases , if the subject is big enough to fill most of the frame then it will give good results.
Spot Metering
If you like taking pictures in manual mode. This is going to be your favourite one. Spot metering works by focusing on the area selected by user,you can click anywhere on the picture and the camera will automatically adjust the right setting for your image. see bellow.

ISO 100
In this image we have taken 3 separate shots side by side using spot metering.
While Circles are the points where we spotted while taking pictures. We can clearly see the difference between the three.
- In spot metering ,when you click on a dark area of the image , the whole image becomes bright to compensate and vice versa.
- Spot metering Doesn't hurt ISO value much that means less chances of appearing noise in your images.
See left ,The direction of light approaching can be spotted by observing the shadow of the petals. In the first image we spotted on the darker side and as a result the image became brighter while in the right ,when spotted on the bright area of the image it became less exposed or dark to compensate with the changes.
Focus Mode
Focus mode is the setting for aperture. when working on smartphones, most of them doesn't allow manual exposure instead they have menu suggesting a set of aperture range to select, rest lies with the camera itself.
here is a quick view how it looks like
- Auto
- Macro
- Continuous
Auto
By default auto mode is set. This allows camera to adjust aperture by measuring the depth of subject itself.
Macro
macro photography is the art of taking photographs of microorganisms,small insects,birds,ants,bugs etc..
In this mode the Aperture is set to higher f-stop. and the depth of field is very shallow. Objects only closer to camera lens are sharp. Rest of the frame gets either completely blurred or have no details. See below.

in this image our subject is a tiny 1.5 inch flower buds. We have taken picture by using macro focus mode, which allow us getting close to our subject by adjusting aperture such that the depth of field becomes very shallow. objects beyond the aperture range will be completely out of focus. You can take better shots if your camera supports wide range of f-stop numbers.
Antibanding
Antibading is a camera setting that prevents appearing of horizontal or vertical lines(banding) in images.When taking photographs or shooting videos of TV , monitor screens the situation becomes worse. Banding can also be seen while shooting with tube lights.


This image has been taken by illuminating objects with an artificial source of light. We have taken images with antibanding turned on/off side by side.
These bands can affect your picture dramatically . Cameras allows antibanding at 50hz/60hz frequency. these are worldwide accepted electrical grid frequencies. For India it is 50Hz while in case of US it is 60hz. you need not worry more about banding. Almost every Electronic devise have a lebal denoting operating frequencies or you can simply read your electric meter grid to know the right antibanding for your work.
These bands can affect your picture dramatically . Cameras allows antibanding at 50hz/60hz frequency. these are worldwide accepted electrical grid frequencies. For India it is 50Hz while in case of US it is 60hz. you need not worry more about banding. Almost every Electronic devise have a lebal denoting operating frequencies or you can simply read your electric meter grid to know the right antibanding for your work.
Concluding
We have come this far and learned a handful of technical terms related to Photography and ,hope this Guide has helped you in thorough understanding of points covered.We took an illustrating measure to narrate every step. If you find a point has not been covered or missing , feel free to write us. We take your suggestions potentially. Thank you!
Very informative...thanx
ReplyDeleteThank you Vivek! We are glad to hear from you .
Delete